09-11-2012

Cranberry & Almond Granola Bars

I thought you might be tiring of the same ‘ol descriptive words…amazing or yummy or delicious! So I thought I’d go all crazy and call these granola bars…Most Delicious!

These are SOoooo good that the hardest part is to stop eating the granola mix before you bake it. You know, so you could actually end up eating the finished product!

This recipe is inspired from Smitten Kitchen Thick & Chewy Granola Bars. I really liked how flexible her recipe was but I wanted to try making these without any corn syrup. I also lowered the sugar and omitted the salt so we could be justified when we eat half the granola bars in one sitting! And I require the peanut butter as it really helps the granola bar stay uncrumbly and contributes to the chewiness factor. Plus, I threw in coconut to counteract the lowered sugar.

And oh yeah, these are gluten free!

The list of characters….

Makes 16 granola squares

Ingredients

2 cups quick cooking oats, gluten free if necessary
1/2 – 2/3 cup organic sugar
2 cups nuts (I think slivered almonds are best and very kid friendly…but feel free to shake it up!)
1/2 cup dried fruit (myself, I’m a big cranberry fan)
1/2 cup shredded coconut
1/3 cup ground flax seed (optional)
1/4 cup peanut butter
5 tbsp unsalted butter, melted
1 tbsp H2O (I do not remember much from chemistry but I love using this abbreviation for water)
a little less than 1 oz of each: honey, maple syrup, and molasses (1/3 cup in total when all three are combined…just fill 1/3 measuring cup up with some of each)
Instructions

Preheat oven to 350 degrees. Butter a piece of parchment paper large enough to extend over a 9″x9″ baking pan. You want to be able to use the sides of the parchment paper to lift the baked granola out of the pan prior to cutting.

Place 1/3 cup of the oats into a food processor and chop until the oats reach flour like consistency. You are basically making oat flour. If desired, you could just use store bought oat flour but I like the do-it-yourself method.

In a large mixing bowl, combine the oat flour with remaining 1 and 2/3 cups oats and all other dry ingredients. In a separate bowl, stir together the melted butter, peanut butter, water, and the 1/3 cup mixture of honey, maple syrup, and molasses. (I hope the 1/3 cup makes sense…basically just put a tad of each into a 1/3 measuring cup).

Now comes the fun part! Pour the moist ingredients into the dry ingredients and mix together until well combined. You can use a plastic spatula, wooden spoon, or your hand for this part. I use my hand…easier to eat the stuff as I go along!

Now, STOP eating the granola and leave some for the granola bars!!!

Spread into the buttered parchment paper/baking pan.  And then press down the granola with your hands or a large spatula as much as possible. This is really important to help the granola bars stick together. Bake for 20 minutes, until slightly darkened on top. Remove from oven and once again, with a spatula, press the mixture down to help with the adhesiveness.

Do not remove the parchment paper from the pan for at least 30 minutes. This also helps the bars to  seal together. And if it’s really humid out, after letting the bars reach room temperature, place them into the fridge and allow to cool further for an hour or so more.

I’m telling you this so Kashi & Nature Valley will be jealous of how well your home made granola bars stay together!

Now, once you are ready to eat these bad boys, use a serrated knife to cut these in a sawing motion. Oh wait, you’ve already stolen a little bite…don’t worry…I have too when they come right out of the oven, but it’ll just be our secret!

Store bars in the refrigerator or freezer in a resealable bag. If frozen, simply allow the granola bar to sit out at room temperature for about 5 minutes. They’ll be cool, calm, and so satisfying!

Also, you can substitute chocolate chips for the dried fruit or drizzle chocolate on top if desired. I’ve found that cranberries and slivered almonds are my favorite way to go. When I’ve tried adding chocolate, the bars were still good but almost a little too rich or intense. So you may want to reduce the peanut butter a little if you add chocolate. Also, if you aren’t into dried fruit or chocolate then feel free to use all nuts. The basic amount is 2 to 3 cups total of nuts and dried fruit.

I’m really not kidding about how addictive these are. It is so hard to eat just one, so hard to put that spoon down once all the ingredients are combined…you just CAN’T STOP! Or, at least I can’t!

I hope ya’ll like these as much as my family does!

Love,

Jessica

04-19-2012

Do you CSA?

Hello Father,

I have a confession. I love gardening, I love farmers, I love dirt. But I just can’t imagine joining a CSA. I want freedom of choice, to pick my veggies just the way I want, when I want. You see, God, signing up for a CSA requires commitment. And, I have come to realize that I don’t necessarily enjoy commitments. (I can’t even keep up with once a week pilates.) I do go to the Farmer’s Market faithfully and I shop at the local grocer each week. But I still feel unfaithful to the farmer by not participating in a CSA. Does my selfishness of wanting to choose my veggies each week mean I’m not really supporting the farmer? That rain or shine, drought or flood, he’ll have money to keep his farm afloat no matter how the produce turns out?

Help me out,

Jessica

****

I really am serious. Even though I encourage all my friends to participate in one, I have a huge commitment issue with CSA’s (Community Supported Agriculture). And until this past Tuesday I kept telling myself that if there was a farm that had a pick-your-own veggie CSA that I would participate. But then you find that ‘answer’ and realize, you’re still hesitant.

You see, I love going to the different vendors at the market and choosing a tomato here, a carrot bunch there, and a pile of lettuce greens at the next one. And my worry is this, if I commit to spending my $20/week with only one vendor – will I regret it? I definitely won’t regret the quality – its the best there is, but will I regret not getting to spend my $ with lots of vendors in lieu of spending it with one?

What do you think? Do you like your CSA? Do you have one where you choose your veggies or do you get an exciting surprise bag each week? Should I just go for it and try it out? And if you are a farmer…I’d love to know your thoughts on CSA participants versus farmer’s market buyers? Do you get as much $ from going to the Farmer’s Market or would you rather have it all in CSA participants?

Thanks for helping me with my dilemma! Jessica

03-28-2012

Pork Tacos

Lately its been Mexican dishes coming out the wazoo at my house! We hosted a wedding shower at the house for dear friends and made pork & chicken tacos with a whopping 8.5 pounds of meat! I obviously missed the memo that there were only 15 people coming! So as you can imagine, we’ve had lots of tacoy type dishes for the last week.

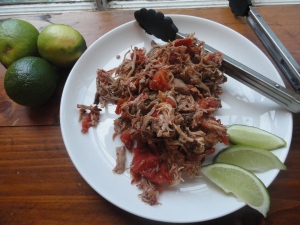
Here is the base recipe I used for the pork…I cooked the chicken in a separate crock pot and just altered the amount of ingredients. The meat was very tasty, juicy, and well flavored.

Ingredients
6-8 pound boston butt (about the smallest you can find these is normally7 lbs.)
3 tbsp chili powder
3 tbsp dried oregano
3 tbsp unsweetened cocoa powder
2 tsp kosher salt
3 cups salsa
2 bay leaves

Directions
Place chili powder, oregano, cocoa powder, salt, salsa, and bay leaves into the bottom of crockpot and stir to mix. Remove excess fat from pork and rinse off. Place pork on top of the liquid mixture in crockpot. Cook for approximately 8 hours on low heat. When the pork is falling apart and is extremely ford tender, it easily pulls apart, it is finished.

Discard liquid from crockpot and pull pork apart with two forks and don’t be afraid to use your hands if necessary. I completed this task on my cutting board but you might find it easier to do it directly in the crockpot. Just make sure you discard the liquid prior to this task! You could save the liquid as a sauce for the tacos, but I found it to be greasy from all the pork drippings and just too much liquid.

Heap up your tacos with plenty of pork and lots of side fixings…salsa, limes, cilantro, cheese, & guacomole.

Enjoy!

Jess

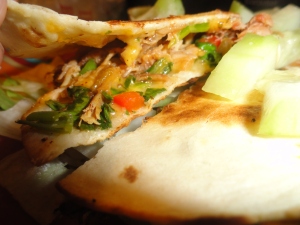
I forgot to take a picture of an actual taco with all that meat, but here it is in a quessadila.

01-09-2012

Lemon Poppyseed Muffins

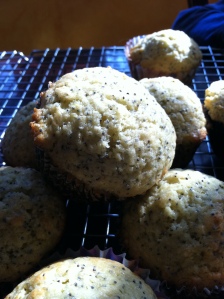
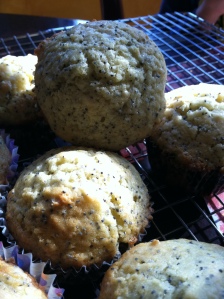
Welcome to Muffin Week!!! I have lots of tasty muffins in store for you this week and today’s muffins include one of my favorite ingredients – poppy seed. You’ll find that I went a tad (okay, maybe more than a tad) overboard on the poppy seed, so feel free to use less. I just love their crunch!

I cannot explain how many times I’ve tried creating a lemon poppyseed muffin but I could never figure out the right proportion of ingredients. It is normally too greasy or too spongy and no matter how much I altered butter/oil/milk/egg I could never get them right. Well this one worked perfect! I found a recipe for a poundcake muffin and decided to use half the yogurt, added in milk, and a lot more poppy seed.

So without further adieu….

Lemon Poppyseed Muffins
Adapted from Joy of Baking
Yields 12 – 15 muffins

Ingredients

2 cups all purpose flour
3+ tbsp poppyseeds
1/4 tsp kosher salt
1/2 tsp baking soda
4 ounces plain yogurt
4 ounces whole milk
4 ounces unsalted butter, softened
1 cup organic cane sugar
1 large brown egg, preferably from a farm, lightly beaten
grated lemon zest from 1 large lemon
1 tbsp pure vanilla extract

Preparation

Preheat oven to 400 degrees and line a muffin pan with paper liners.

In a large mixing bowl, stir together the flour, poppy seeds, salt, and baking soda. In another bowl, mix together the yogurt, milk, lemon zest, and vanilla extract.

Using an electric mixer, beat the softened butter and sugar until it is light and fluffy, approximately 5 minutes. Mix in the egg, beating well to ensure it is mixed thoroughly. Now, beat in the liquid milk mixture, scraping down the sides as needed.

Next, make a well in the bottom of your dry mixture bowl. (I forgot to take a picture of this step, but basically you just want there to be an empty spot in the bottom middle of your dry mixture.) Pour the liquid into this well and stir until just combined. BE CAREFUL – the more you stir, the less your muffins will rise and be airy. So do not overmix/overstir, etc.

Fill muffin tins approximately 1/2 to 2/3  full and bake for 15-18 minutes in preheated oven. I hope you enjoy as much as I did!

There are lots of tried & true ways to make your muffins turn out just right – where they look great and taste even better. Click here to view Joy of Baking’s helpful hints for making muffins.

And I’d love to know…What is your favorite type of muffin?

Jess

01-06-2012

A week of muffins

Here in my house we adore muffins! I love to bake them and my kids love to eat them! So with all that muffin love, I thought I’d declare next week MUFFIN WEEK and share some of my favorite muffin recipes with you. From the classic blueberry to banana bread to lemon poppy seed….these are the visions of my heart. I’ve tried to make them as healthy as possible while still making them taste like a muffin should. They all have fruit in them and are all delicious!

So check in next week for some new takes on tasty muffins!

Have a great weekend ~ Jess

Blueberry muffins made from local blueberries

Lemon Poppy Seed Muffins

01-04-2012

Classic Pot Roast

This meal is nothing fancy, nothing elaborate, but is so good in the simple essence of roasted beef. It is comforting on a cold night and can be served to good friends over for dinner to just catch up & relax. I hope you enjoy!

Budget Note: This grass fed 1.5 pound boneless chuck roast cost me under $12 and fed 4 adults. The portions were a healthy amount combined with a side of brown rice and roasted carrots & onions. The total cost for my entire dinner was $4/person. So maybe next week you can find some locally raised, grass fed beef to include in your weekly menu. And, if you only fed 2 adults this roast, you could put the leftovers into a stir fry to stretch the meat further.

Classic Pot Roast

Ingredients
Marinade
3 tablespoons ketchup
2 tablespoons cider vinegar
2 tsp olive or canola oil
2 tsp soy sauce
2 tsp Worcesteshire or Heinz 57 Sauce
1/4 tsp dijon mustard
1/4 tsp garlic powder
1/4 tsp fresh ground pepper
1.5 lb boneless chuck roast

Roast
1 small yellow onion, cut into quarters
2 cups fresh baby carrots, sliced in half
2 garlic cloves, chopped
2 bay leaves
1/4 cup chicken broth
1/4 cup red wine

Preparation
In a gallon size Ziploc bag mix together all of the marinade ingredients and then add the roast. Allow to marinate for 4-8 hours, or overnight.

Preheat oven to 350 degrees. In a dutch oven or oven safe skillet, heat apprx. 2 tsp of olive oil over medium high heat. Remove roast from marinade and discard marinade. Apply kosher salt and fresh ground pepper to roast and then sear on each side for approximately 4-5 minutes. This helps seal in the juices. Once all sides have been seared, remove roast from pan.

Reduce heat to low and add onions, carrots, and garlic. Saute for approximately 1 minute and then add in chicken broth, stirring up the browned bits on bottom of pan. Remove from heat and place 1 bay leaf on the top of carrots & onions.

On top of this, place the roast. Then add the remaining bay leaf on top of the roast.

Lastly, pour the red wine over the bay leaf and roast.

Place pan into preheated oven and allow to cook for approximately 45 minutes to 1 hour. The time in oven will all depend upon the size of your roast. If your roast is 3 to 4 pounds it will probably require 1.5 to 2 hours roasting time. Use a digital thermometer (LOVE MY HUSBAND….he got me a new (and working one) for Christmas!) to determine when your roast is finished. Medium rare will be 145 degrees; medium will be 160 degrees; and well-done will be 170 degrees.

Remove your roast from pan and allow to rest for 10 minutes. Resting allows all the juices to settle back down. Enjoy with the carrots & onions. This would also be great served with mashed potatoes. Maybe, blue cheese mashed potatoes? Yummm! Also, the juices in the bottom of the pan make this even juicier!

I’d love to hear if you try the recipe out or if you have another classic pot roast recipe you use.

Cheers to eating locally & humanely raised cattle!

Jess

10-21-2011

What not to do when making a quiche!

Sometimes my love of food and cooking gets me into trouble and my family has to have take-out because I got a little to creative with a recipe and voila – it’s not what I was hoping for!

About a year ago, I saw a quiche in a local deli that had apples, bacon, cheddar….which all sounded great together. Well, perhaps there quiche was scrumptious, but I’m telling you….my attempt at this creation was close to a disaster!

Maybe, it was simmering apples in apple cider vinegar….what made me think vinegar would taste good mixed with eggs?

Maybe, it was the pepperjack I substituted for the cheddar since that was all I had at home?

Maybe, it was the rosemary the recipe called for, that in my gut I didn’t see how it could work, but why not try?

Or maybe, it was the pecans I decided to put in there because sometimes quiches are so soft and wouldn’t it be nice to have a crunch somewhere in that bite????

Needless to say – my creation, while pretty nice looking – I think, was pretty gross tasting. One bite and I spit it out. My poor husband actually swallowed his bite, took another (brave man), and then suggested we get take-out. The entire quiche, minus 2 bites, went into the trash.

Hence, I’ve decided, the more simple the recipe – sometimes the better. Especially, when it comes to quiche. AND – do not use pepperjack in a quiche!

Photos of my less than perfect quiche…

Not as great tasting as it may look

Why couldn't you taste better?

PS…that stuff that looks like sausage….nope, not sausage…its the pecans after being baked in eggs! No wonder they didn’t taste good.

Recipe for a tried & true quiche that I promise – is a keeper!

Ingredients

5 large eggs, lightly beaten

1 cup whole milk or half and half

1/2 tsp salt

1/4 tsp pepper

1/4 – 1/2 tsp nutmeg

2 cups chopped fresh baby spinach

1/2 pound bacon, cooked and chopped

1 cup grated cheddar cheese

1 9″ deep dish pie crust (frozen or refrigerator) Tip: if buying frozen I suggest the brand name as it usually is a tad more deeper than the store brand crust. Not sure why, but I have a hard time getting all the egg liquid in there when I buy the store brand crust. If you buy the refrigerated pie crust you will just fit into a 9″ pie plate at home.

One other note…I do not actually measure my salt and pepper when adding to this recipe. I just use a dash of this and that. I think the amounts above are probably close to how much I put in there. Also, I always use kosher salt! I could write a whole post on salt but in the end, I just believe you should always use kosher salt when cooking or baking.

Preheat oven to 375 degrees. In a mixing bowl, whisk together beaten eggs, milk or half and half, salt, pepper, and nutmeg. Next place chopped spinach, chopped bacon, and grated cheese in bottom of pie crust. Pour the egg mixture on top of those ingredients. Bake for approximately 40 minutes until top is browned and egg mixture is set.