07-29-2014

Fluffy Light Spelt Biscuits

IMG_6695

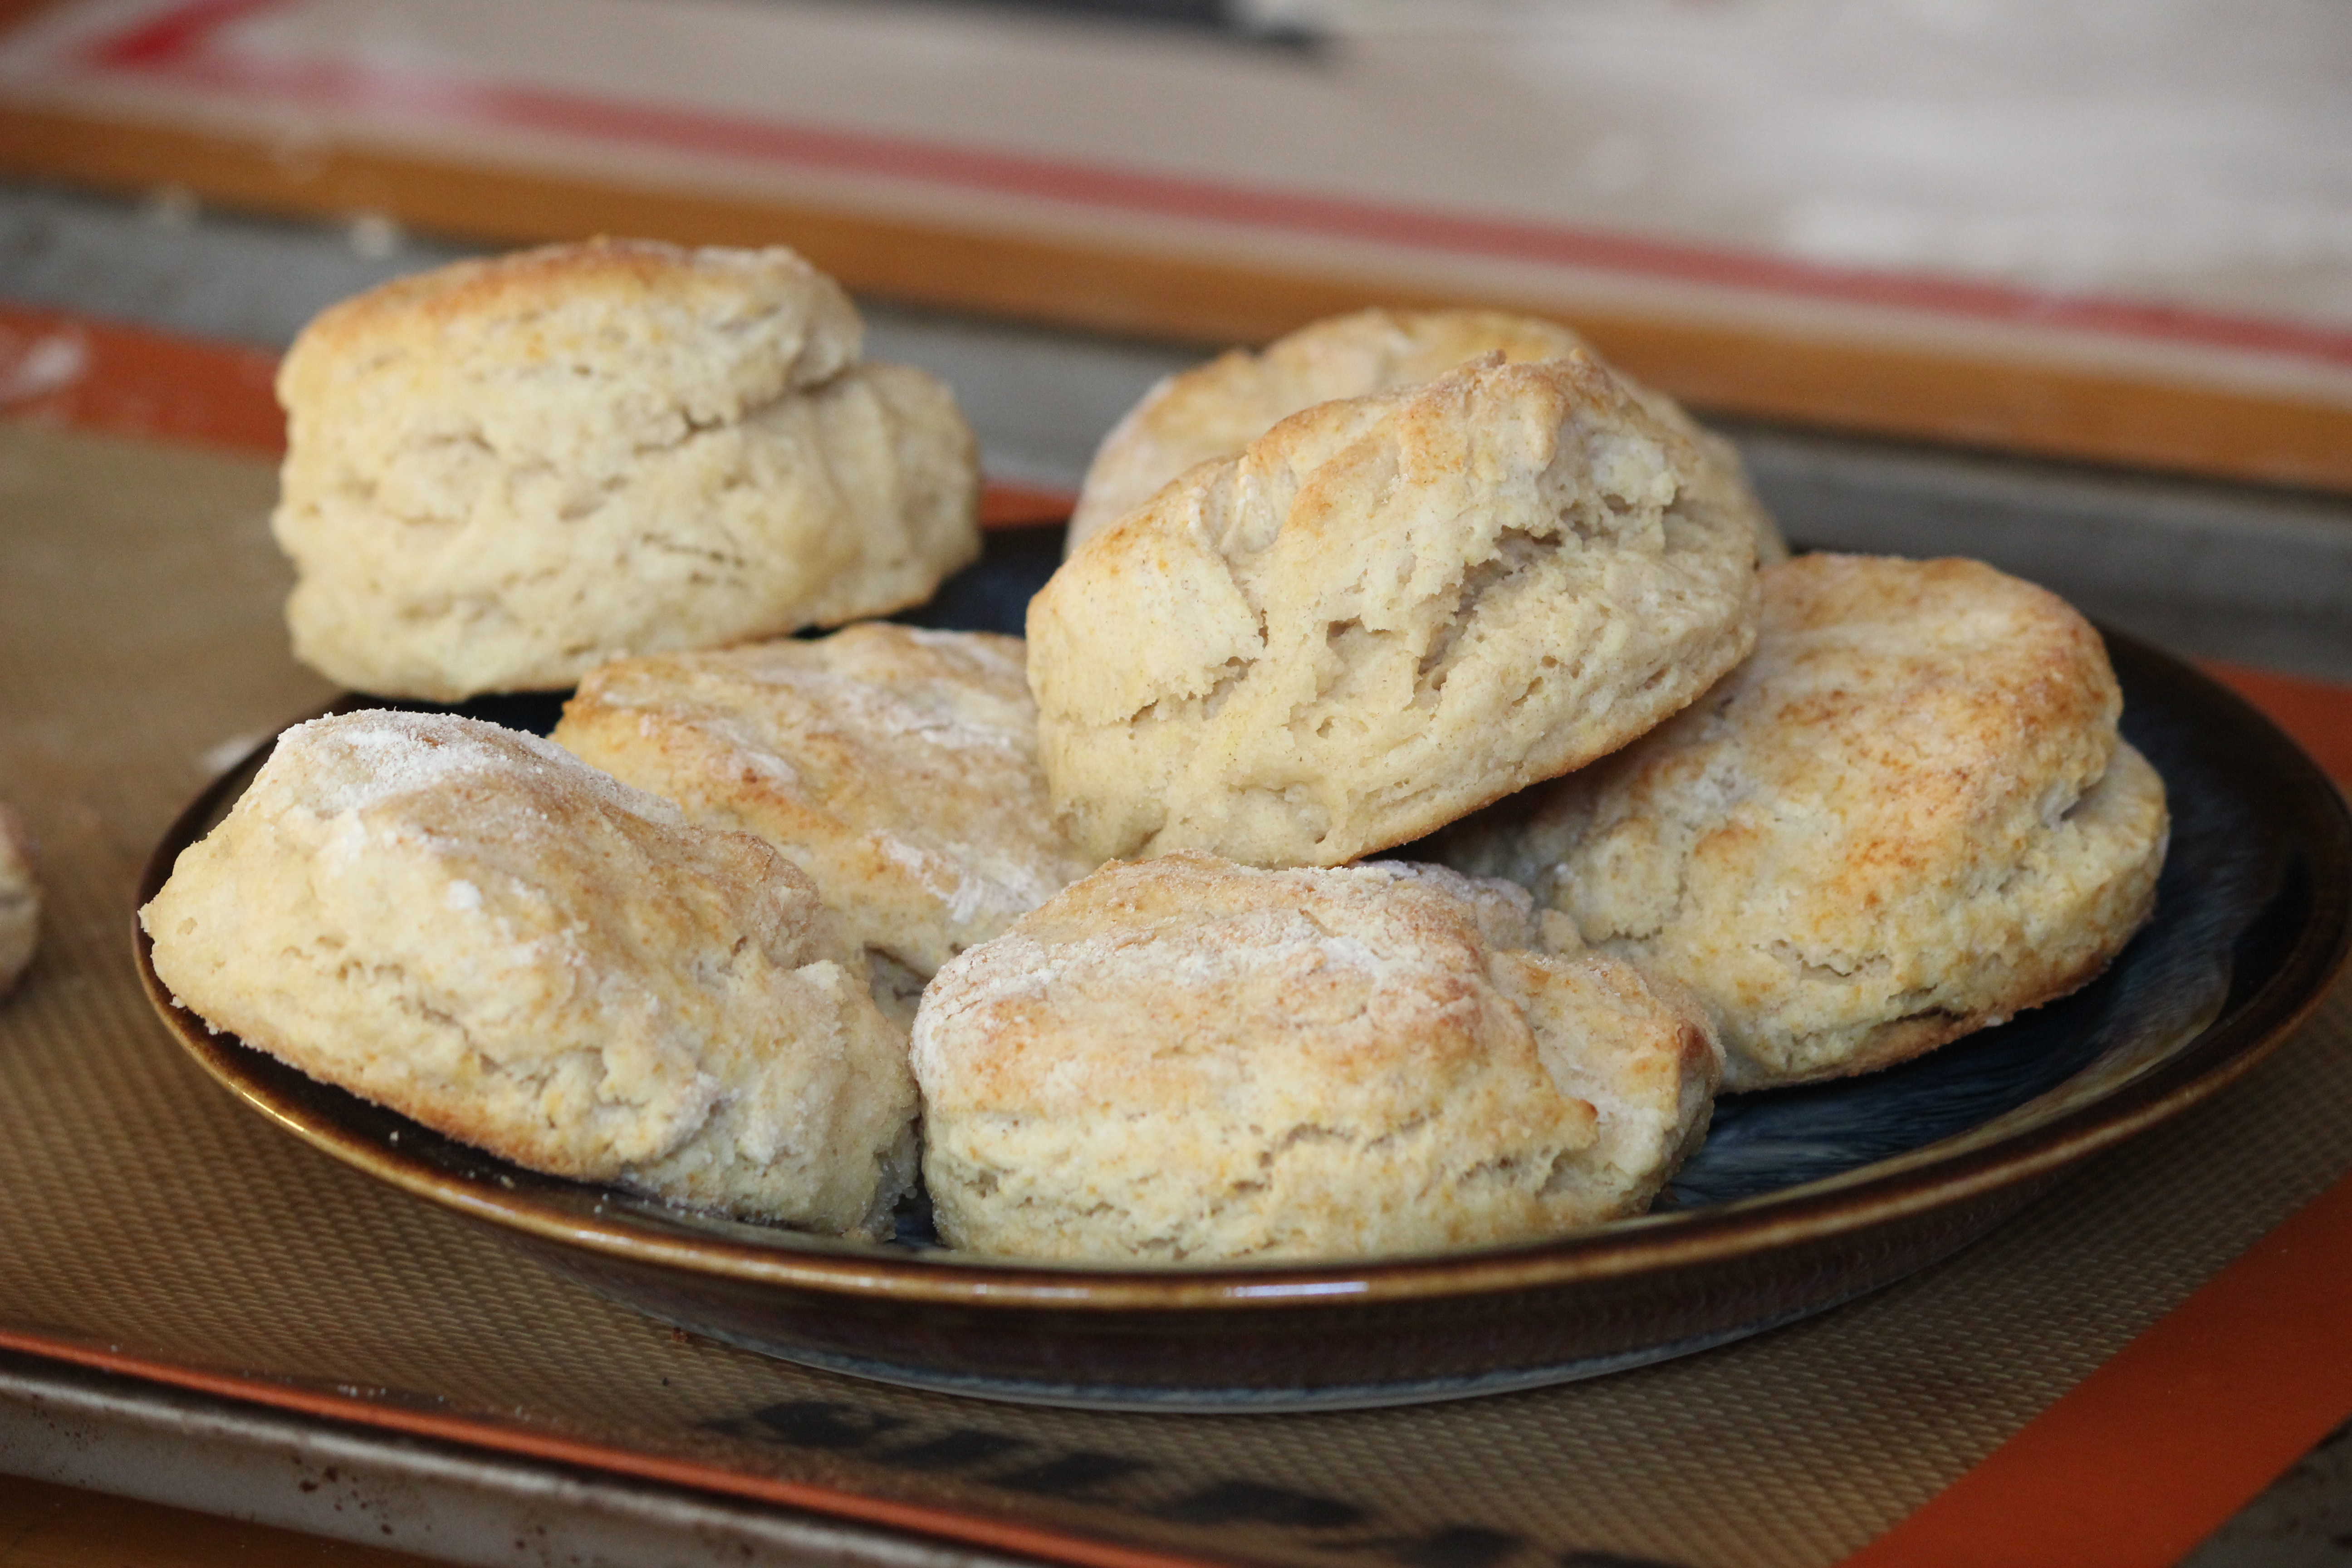
I wonder what it was like when the 49’ers struck gold…did they do air kicks while shrieking out “Eureka”? Because that’s what I did when I took my first bite of these delicious biscuits. They are that scrumptious!

Baking with spelt can be tricky. Sometimes it leads to hocky puck dense biscuits or the opposite end of the spectrum…cookies that  spread all over the baking sheet. But these turned out pretty close to perfect and I think a lot of that has to do with keeping the butter properly chilled and using the correct techniques to ensure as much steam as possible gets trapped inside the baking biscuits.

I’m pretty sure that my grandma’s would agree with me that making biscuits is an art form and these tips & tricks below will help you get it just right so you can do your own air kicks!

Enjoy ~

sig

Tips & Tricks

The chilled, almost frozen, butter leads to more steam being produced in the baking process which leads to more tender & fluffy biscuits. And folding the biscuits like a letter is what produces lots of different layers in your biscuits. Also, if you twist the cutter instead of going straight down your biscuits will not rise very well. And placing the biscuits so close together traps more steam as well.

Fluffy Light Spelt Biscuits

Prep Time: 35 minutes

Cook Time: 12 minutes

Total Time: 47 minutes

Yield: 6-8 biscuits

Ingredients

  • 2 cups white spelt flour (VitaSpelt recommended)
  • 1 TBSP baking powder
  • 1/2 tsp kosher salt
  • 5 TBSP chilled butter
  • 1/2 - 2/3 cup milk

Instructions

  1. Preheat oven to 450 degrees F. Line a baking sheet with parchment paper or silpat liner.
  2. Take chilled butter out of fridge and with a paring knife, cube into 1/2" pieces. Place cubed butter into freezer for at least 5 to 10 minutes.
  3. In a large bowl whisk together the flour, baking powder, and salt. Using a fork or pastry blender cut the butter cubes into the flour until it resembles coarse crumbs. Place bowl into the freezer and allow the flour & butter mixture to chill thoroughly for 15 minutes.
  4. Using a wooden spoon, mix the milk into the chilled flour, starting with just 1/2 cup of the milk. Stir gradually until the flour begins to pull together and dough is completely sticky, adding additional tablespoons of milk as needed. I used a full 2/3 cup of milk but it is always best to start with less milk and add more as you go.
  5. Sprinkle a generous amount of flour onto a pastry mat or wooden surface. Place dough onto floured surface and then sprinkle another generous amount all over the top of the dough. Using the palm of your hand, pat out the dough until it is approximately a 1" thick rectangle/letter shape.
  6. As you work with the dough, don't be afraid to sprinkle extra flour on top and sides as needed. You don't want to dry out the dough but at the same time, you don't want it so sticky that it sticks to your hand.
  7. Now fold the rectangular dough up the same way you would a letter. So the bottom third up onto the middle, then fold the top dough onto the middle portion. Pat down again to a 1" thick rectangle/letter shape. Repeat the fold process one more time. Pat the dough down to a final 1" thickness.
  8. Using a 3" round biscuit cutter, press biscuit cutter straight down without twisting it. Place biscuits directly onto the lined baking sheet, spacing only 1/2" apart.
  9. Bake for approximately 12 minutes, rotating halfway through, until golden brown.


07-08-2014

Brownie Ice Cream Pie

Ever made brownies that were just a tad crumbly or have more cookies on hand than you should could eat? Or, ever purchased way too much ice cream for the 4th because of that buy one get one sale?

IMG_6633

Well here, my friends, is the solution!

This was inspired by a much cleaner, more holistic Dessert Pizza by Angela at Oh She Glows. My version is definitely not clean eating or refined sugar free or any vegan thingamadoey. One day I do hope to try out Angela’s Dessert Pizza but yesterday I needed to use up some brownies and the over indulging ice cream that wouldn’t stop enticing me. It didn’t hurt that it was also Jared’s birthday and I was able to make a birthday dessert for him with ingredients I already had on hand.

IMG_6628

Ingredients
1 batch of already made brownies or chocolate chip cookies
1 pint chocolate ice cream, slightly chilled (not frozen)
1 pint vanilla ice cream, slightly chilled (not frozen)
1 batch Peanut Butter Shell Drizzle (from Oh She Glows)
1 batch Chocolate Ice Cream Shell
coconut oil

Recipe
Using a teaspoon of coconut oil, lightly grease the bottom & sides of a springform pan.

Crumble brownies or cookies onto bottom of springform pan. Using your palms, press the mixture down firmly and spread to sides of pan.

In a glass bowl, stir together the chocolate and vanilla ice creams until swirled together. Pour ice cream mixture onto the top of the brownie crust. Place ice cream pie into freezer and allow to freeze for 10-15 minutes.

Make one batch each of the peanut butter drizzle and chocolate ice cream shell. Place the peanut butter drizzle into a plastic zipper top bag and snip the corner. (This makes for easier drizzling! The chocolate syrup can easily be drizzled with a fork.)

Alternating between the peanut butter and chocolate toppings, drizzle each sweet concoction onto the top of the ice cream pie. Once all the toppings have been used up, place the pie back into freezer for at least 4 hours for everything to set nicely up.

Scrumptious!

resize


Enjoy ~

sig


03-11-2014

Sweet Italian Lasagna

I’ve wanted a great, not just decent, spaghetti sauce for ages and have finally crafted one that we love! What’s even better is that I also tried it in a lasagna and the gluten free noodles (Tinkyada) held up perfectly! I was so surprised because the few times I’ve tried rice spaghetti, they became pure mush. But these rice lasagna noodles were fantastic!

The sauce is thick, flavorful, and uses the tomatoes I canned last summer. I am always excited to use tomatoes from my own garden! If you don’t have home canned tomatoes, no worries, just use whole tomatoes with their juice.

IMG_5460


Tips & Tricks ~ I personally cannot stand the fatty oil that sausage produces. So using paper towels, I continually wipe away the oil in the pan as it appears. This way you aren’t cooking the sausage in the oil. For a faster cooking time, substitute the stew meat with 1lb of ground beef. You won’t have the great texture that stew meat provides but will be able to use the sauce almost immediately. Just taste after 20 minutes of simmering to see if flavors have melded enough. Also, seasoning with a tiny bit of salt & pepper a few times while simmering creates a more flavorful sauce. If you wait till the very end to add salt – you end up with a recognizable ‘salty’ taste.

Inspiration for these recipes came from Gluten Free Recipe Box

Spaghetti Sauce

1 lb beef stew meat, cut into bite size pieces
1 lb sweet italian sausage
1 cup chopped sweet onion
3 garlic cloves, minced
1 tbsp italian seasoning
1/2 tbsp dried tarragon
12 oz tomato paste
8 oz tomato sauce
32 oz homemade canned tomatoes or whole tomatoes with juices
1 1/2 tsp coconut sugar
1 tbsp balsamic vinegar
1 bay leaf
1-2 cups water
olive oil
kosher salt & fresh ground black pepper

In a large dutch oven, cook ground sausage until browned. Remove sausage from pan and set aside in a separate bowl. Wipe pan down to remove excess oil and lightly brown the bite size pieces of stew meat. Once browned, remove stew meat from pan, adding to the bowl of ground sausage.

Wipe dutch oven down again, and heat two teaspoons of olive oil over medium heat. Add onions and sprinkle with a pinch or two of kosher salt. Saute onions, stirring often with a wooden spoon, for 5-7 minutes, until turning soft and just beginning to brown. Add garlic, tomato paste, and dried herbs; sauteing for an additional minute. Add meat back to dutch oven and then add all other ingredients, through the bay leaf, and add 1 tsp kosher salt and 1/2 tsp ground pepper. Stir well and if the sauce looks too thick, add up to 2 cups of water. 

Bring sauce to a slow simmer and cook for 2-3 hours, stirring occasionally, until stew meat is tender.

Yields: ~ 8 cups sauce

Lasagna Recipe

Tips & Tricks ~ This is a great dish to have kids help with! They can grate the cheese & sprinkle it over the lasagna, pour the sauce where needed, and of course, be in charge of the lasagna noodles. And you’ll be left with 1 or 2 extra noodles…kids love to eat these!
Using fresh herbs in the ricotta is my secret ingredient for this lasagna. The herbs provide a fresh vibrant taste to the lasagna that you can’t replicate with dried herbs. I’ve also found that the less sauce you use, the better. This allows for a more firm set of the lasagna. But no fears if you use more – it might be a bit runny but still as delicious.  And any hard cheese (such as Gouda) can be exchanged for the Parmesan.

1 box of gluten free lasagna noodles (strongly recommend Tinkyada)
3 cups of spaghetti sauce
8 oz ricotta
fresh rosemary & oregano chopped (apprx 4tbsp total)
kosher salt & fresh ground black pepper
1 1/2 cup shredded mozzarella
1/2 cup freshly grated Parmesan or Gouda cheese
olive oil

Preheat oven to 350degrees.

Bring large pot of water to boil, adding a tbsp of oil and a tsp of salt. Add lasagna noodles, cooking for 10 minutes and then drain.

While lasagna boils, in a small bowl stir together the ricotta with fresh herbs and a dash of salt and a few turns of the pepper mill.

Using olive oil, ‘grease’ sides  and top surface area of lasagna pan.

Add a little sauce to the bottom of your baking dish. You don’t want a lot of sauce on the bottom, just a thin covering – primarily of the sauce versus the meat. Spread 1 layer of lasagna noodles and then using a spatula spoon/spread a thin layer of ricotta over the noodles. You may need to use your fingers to spread it all over. Sprinkle with mozzarella and a few sprinkles of the grated Parmesan. Now add another layer of spaghetti sauce, noodles, ricotta and cheeses. Repeat layers until you have a final bit of sauce on top which you cover with the last of your mozzarella and Parmesan cheeses.

Bake at 350 for 45 minutes, until cheese is nice & bubbly and browned all over.  Allow to sit for 10 minutes before cutting.

Enjoy!!

sig

03-03-2014

Grocery Store Gift Card Giveaway (WINNER UPDATE)

*Winner Update*

I was impressed with all the different and delish sounding ways ya’ll cook pork! I never realized how boring my pork dishes were till I started reading the entries.

The winner, chosen at random, is Lee with “I prepare pork loin in the crockpot. I combine 1 can of whole cranberry sauce, 1Tbsp. of Dijon mustard, 1/2 onion, chopped, 1 Tbsp. of brown sugar and a splash of apple cider vinegar. The cranberry compote is wonderful as a “gravy” on mashed potatoes!”

Congratulations Lee! Be on the lookout for an email from me. Thanks to the rest of you for all these wonderful recipe suggestions! I can’t wait to give them a try.

************

As I mentioned the other week, I did not win the Food Lion Frugal Cook-Off but I did have lots of fun! I got to meet a lot of neat bloggers, had a great teammate, and got to experience a Top Chef type challenge.

IMG_1234
(my teammate Katie & I)

IMG_1399
(our herb crusted pork chop dish)

A new video from the event…https://vimeo.com/87511429

A fun video of Katie & I answering questions while we cooked. As you can tell, they did a great job pairing us together!  https://vimeo.com/87436536

Now to the point of this post…Food Lion was very generous in not only sponsoring the event but also providing a $100 gift card for each blogger to share with their readers!

To enter the contest, please share a comment below answering the question…what is your favorite way to cook pork? I will pick the winner next Monday morning.

Good Luck!

sig


02-28-2014

the 2 essential skills for preserving food

Read a few pages of any canning book or magazine and there’s a good chance you’ll be pretty afraid of giving your family botulism. While that is definitely possible, the chances of that occurring are pretty slim…if you have the following skills…

IMG_5512


1. Being able to follow a recipe’s direction
There is a science behind the preservation of food and canning recipes from reputable sources have been developed & formulated that follow specific rules for safety. So as long as you can follow directions, you will be able to pull this off. I promise! If you are just starting into the world of canning, I highly recommend Ball’s Blue Book. This is your staple, go to book for the mechanics behind canning. From there, the number of books and resources for canning is limitless. You just want to make sure that your recipes are from a reliable entity and align with what you’d find in a Ball Blue Book.

For example, when you have someone telling you that tomatoes don’t need to be processed (meaning no water bath, no pressure canning)…then I’d highly recommend avoiding that recipe. But if you follow the standard rules of sterilizing your jars, preparing your produce the correct way, and processing for the recommended time…then you should feel that you can do this! Which leads me to…

2. Confidence
If you didn’t grow up watching your mom & grandma ‘put-up’ then I understand how you’d be a bit worried if you can pull off preserving your own food. There are plenty of horror stories out there…even for experienced canners, things sometimes go wrong. But it’s just like riding a bike, or the train chugging up the mountain…the mantra of “I think I can, I think I can” …goes a long way. Believe in yourself & your abilities, believe in your desire to feed your family nutritious food, believe in wanting to use up the figs from your in-law’s overflowing tree, believe in wanting to save your family money… There are so many different reasons for wanting to ‘put-up’, and you just have to take the first step.

Start simple, read your recipe numerous times before you begin, and believe in yourself!

sig


02-07-2014

Food Lion Frugal Cook-Off

originAL


UPDATE: I just found out that the cook-off is not open to the public due to space of the venue. So please just cheer me on virtually instead!

For the last month I have felt my world spinning faster than I would like and while I yearn for less matter to fill my brain, I realize that sometimes there are simply busy seasons in our lives.

Between a bathroom remodeling project that we are DIYing, launching a small business (yay! more details coming soon), and redesigning this blog (yay, again!) I feel that my somewhat orderly life is stretching me to the max. Life is a bit chaotic in its design but I try to keep things simple and focus on domestic and mom duties as my priorities. So these extra-curricular projects are throwing me for a loop.

What’s really kept me grounded though has been waking up around 5ish to have quiet time with Christ. I treasure those minutes, that hour, before my children wake. Time to have a mug of hot tea, envelope myself in scripture, and journal my prayers to Him. My time with Him renews me, encourages me, and reminds me to seek His guidance throughout the day.

So what’s a girl to do when a friend & fellow blogger sends her an email about a food cook-off? And not just any food cook-off but a FRUGAL food cook-off! She excitedly requests to be included! And then she prays about it. And then she feels bad that she didn’t seek God’s guidance first to see if she should be signing up. And then she realizes that, in all things, God can bring goodness…bring Him glory. So she tries to remind herself that God gave her passions and enthusiasms in life for a reason. It’s a really nice gift when you’re given the opportunity to do something you love…so perhaps she should just cherish this fun & exciting event!

So to the point of this post….

I am thrilled to be one of the contestants in Charleston’s Food Lion Frugal Cook-Off on 19 February. As any close friend of mine knows, I love food more than almost anything. Really. I have to work really hard on having conversations that do not revolve around food. And, I LOVE TO SAVE $. My favorite conversations sans food include me saying…”guess how much I just saved!” So this cook-off should be really neat. And challenging. And scary. I mean, do I really know how to cook good food without an arsenal of spices at the ready? What do I do if they hand me a pork tenderloin? (I don’t know that I’ve ever made a tender tenderloin…ever…not once!)

Oh, and did I mention that just by participating I will get a $100 gift certificate to share with one of you! And if I win, then the gift certificate becomes $250!

I’ll be back in touch after the event to let you know how it goes!

Jess

sig

09-06-2012

Wheat, oh wheat, what have you done to me?

Good morning! I am writing this at 6:07am. Wow, such a bright start to the morning. Many of you may be on the computer this early on a regular basis, but trust me….I am not. But my little Stella likes to wake at 5:45 just about every morning. Normally, I fight this for about 30 minutes. But this morning, I just went ahead and got up at the crack of dawn. If anyone has some magic tricks up their sleeves of how to get her to sleep in, I’d love to know!

But I digress, already! Kiddos’ wake up times is not what I am trying to write about.

So if you’ve known me for longer than 5 minutes there is a very good chance that you’ve heard about my “delicate stomach” and if you are unfortunately a close friend or a family member, then you’ve probably been tortured by listening to me try to diagnose my problem myself. And if you’re one of my sisters or my husband…well, let’s just say they are probably beyond THRILLED that I’ve finally found what is making my stomach not a very happy camper.

It’s wheat ya’ll. Or to actually be much more specific, it’s gluten that is found in wheat, barley, and rye. So drumroll here….I am going Gluten Free!

I’ve been GF for a week now (how awesome is it, that we gluten intolerance people have a cool abbreviation to stick to our name!) and I’ve already seen a big improvement, and I’m hoping I will continue to see more improvements…like maybe the mild acne that drives me crazy will clear up too?

Now, to why I thought YOU wanted to know all about my stomach issues… I am hoping that there are some readers out there who can help point me in the direction of tried & true, trusted & knowledgeable books, blogs, and cookbooks that’ll help me get creative when cooking & baking.

I’ve already checked a gozillan GF cookbooks out at the library, THANK GOD for libraries. And I’ve been looking at quite a few blogs. But I’m not kidding myself…I’m not the first person out there with this….so I know there are plenty of you who know which books are the most helpful and which blogs have the best tasting GF recipes.

Thanks for taking the time to help a ‘new to GF’ girl out! I really appreciate it!!!

Jess

07-20-2012

Peach Jam (no pectin)

It’s Canning Week at Simple Bites, so I’m linking up there and sharing a recent canning experience…

Having two young kids in our house = A LOT of jam & preserves consumption…

And while we could keep Smucker’s in business for the next eighteen years, I figure they’ll do just fine without us, and so, I make our own jam.  I much rather prefer the taste of my homemade preserves, and this way, I get to control what goes into them.

So a few weeks ago, I had a 1/2 bushel of organic peaches show up at the front door from our local grocer, love KTC!, and they were so yummy and delish, juicy and fresh!

But, I had no fruit pectin in the house and to be honest, I was bound & determined to not buy any. The first ingredient is typically maltdextrin or dextrose. Now granted, those are not the worst types of sugars to put into your body. But sometimes, a girl just wants it au natural! My grandma didn’t have artificial pectin to put in her peach jam, so I was pretty sure I could find a way to make do without. And girl, did I ever! You simply need time. Not something we always have on our side these days, but its pretty neat to make something the same way your grandparents did.

(And, I simply KNOW you are wondering…pectin is a naturally occurring substance found in fruit which is what makes the jam ‘set’ or reach the desired gelling consistency. Foregoing artificial pectin (for fruits with very low natural pectin) requires more cooking time prior to canning, but it also reduce the amount of sugar called for. So really, a plus plus scenario! No artificial crapness & less sugar!)

Okay, now back to reality and a simple recipe you can make at home yourself!

Peach Jam

Ingredients
1/2 bushel ripe peaches
3 cups organic sugar
1 cup honey

Yields ~ 9 half pints

First off, you’ll need to peel the peaches first and I promise, its not as hard as you may think. Simply score an ‘x’ on the underside of each knife and place into a roiling boil of water. After 30-60 seconds you’ll see the skin start to peel away from this ‘x’. Plunge peaches into ice cold water and the peel will be super easy to remove.

I need a video here to show you how easy it is, but just trust me!

Place quartered peaches into a food processor and blend until slightly pureed.

This is where I begin to fall in love, all over again, with my NINJA processor. Oh wait, I never fell out of love with it! It is my go-to kitchen appliance. I LOVE IT!!!

Now add your sugar & honey. And then pour yourself a glass of chilled white wine.

You’ll need the wine, since this next process takes an hour plus, but once again, worth it to not have to use store bought pectin. When you begin the process the consistency looks pretty soupy and runny.

Foam will begin to appear but after 15-20 minutes the foam will begin to disappear. You can also skim off if desired. That is too much work for me, so I just leave it!

In about an hour and fifteen minutes, you will have a thick and gelled consistency. Notice, it’s so thick that it has a hard time getting through the slots in the spoon. This is the consistency you are looking for.

Ladle into hot jars, leaving 1/4″ headspace. Cover with lids & rings. And then process for 10 minutes in a hot water bath.

For complete canning process tips, I recommend Ball’s online guide.

Thanks for humoring my no pectin kick! I definitely use pectin at times but sometimes it’s neat to do something the oooolllllld school way.

So what’s been your favorite canning recipe this summer?

Happy Canning!

Jess

~~~

Peach Jam
Yields ~ 9 half pints

Ingredients

1/2 bushel peaches
3 cups organic sugar
1 cup honey

Preparation

Fill a heavy stockpot with water and bring to a roiling boil. Nearby, place a large bowl filled half full with very cold ice water. Score an ‘x’ on the bottom of each peach.

Blanche peaches for 30-60 seconds in boiling water and then plunge into the ice water. Once slightly cooled, remove skin from peach, pull apart from the stone pit, and place into a food processor or blender. Once all peaches have been peeled, chop the peaches, in processor, until chunky or slightly pureed.

Place chopped peaches into a heavy stockpot, adding sugar and honey. Bring to a slow boil over medium heat. Reduce heat to medium low and simmer for approximately one hour and fifteen minutes; until jam has reach desired gelling ‘set’ consistency. Stir every few minutes while it cooks. Also, approximately ten to fifteen minutes into the simmering process, you can (optional) remove foam from the top of mixture with a metal slotted spoon.

Once desired consistency is reached, ladle hot jam into hot, sterilized half-pint canning jars, leaving a 1/4 inch headspace.  Wipe jar rims and cover with lids & rings. Process filled jars in a boiling water bath for 10 minutes.

*Note* I was extremely exhausted when I began this recipe and ended up only getting 1/2 of the peaches peeled and chopped before calling it a night. To retain the bright peach color overnight, I put a few teaspoons of asorbic acid (vitamin C powder) in with the pureed mix and refrigerated until I could begin again the next morning. I am happy to report, the color stayed beautiful and the taste was unaltered. 

07-09-2012

Tomato, Caramelized Onions, and Gorgonzola Pie

Happy (late!) 4th of July!! I hope everyone had a wonderful holiday and indulged in lots of food, laughter, and relaxation. Fisherman was on vacation and we had a wonderful Staycation. I feel like it was Christmas in July considering the copious amounts of food I ate over the last week.

So what have I been eating??? I’m so glad you asked! Fresh mahi mahi, roasted corn salad, pasta salad, BBQ, hmmmm….there isn’t a lot I haven’t consumed this past week. But my favorite dish was a Tomato Gorgonzola Pie that I adapted from a Gourmet Magazine Cookbook.

I probably shouldn’t admit this, since I am so proud to be Southern, but up until I made this tomato pie, I had never eaten one in my life. Crazy, isn’t it! And there’s no holding me back now.

The best part was that it took me no more than 45 minutes, start to finish. That includes the lets find where I hid the gorogonzola in the fridge and let me go pick some tomatoes and get side tracked into watering the garden. Sorry, this may be a long blog post….its just been a while since I’ve posted and I have all these thoughts I want to share with ya’ll, but I get distracted with kids and life and blah blah, okay back to the pie…

~~~

So to start, you’ll need a pie crust, Gorgonzola cheese, onions, and tomatoes….pretty simple, right!

After placing crust into your pie pan, place pie weights…or dry beans…onto the pie with aluminum foil to keep the middle of the pie from rising while you pre-bake the crust. You need to bake the crust beforehand since you only put it under a broiler once the ingredients are added.

Add some olive oil and your onions into a heavy pan and start the caramelizing process. I just LOOOVE caramelized onions! Even Fisherman loves & appreciates them and he isn’t the biggest foodie on the block.

Also, don’t be afraid to try caramelizing red onions. I did half white & half red the second time I made this and they tasted great. (And yes, I did make & eat this pie TWICE in the past week! Shows you how good it is!)

Good advice for caramelizing onions is to turn your back to them. Find something else to do, you don’t need to stir constantly, just every few minutes.

Now see all those brown bits of good onion residue? Scrape those bad boys up and stir in with the onions. They have all sorts of good flavor! And yep, this picture was from Pie #1 when I only used white onions.

Your piecrust should now be finished baking, so place caramelized onions in first…

…then your cheese, tomato, cheese layers…

…broil for a few minutes until cheese slightly browns, garnish with fresh basil and…

…Voila…Eat that pie up!!!

I hope you like as much as I did!!!

Jessica

Tomato, Caramelized Onions, and Gorgonzola Pie

Ingredients
1 9″ prepared pie crust
2 large onions (yellow or red), very thinly sliced
1 cup crumbled Gorgonzola cheese
5 medium sized ripe tomatoes, thinly sliced
Handful of fresh basil for garnishing

Preheat oven to 375 degrees.  Place pie crust into a glass pie pan. Line pie pan with aluminum foil and fill with pie weights/dried beans/or raw rice. Bake approximately 20 minutes until pasty is pale golden brown around rim. Remove weights and bake another 8 minutes until golden brown all over. If edge of crust looks to dark, place tin foil around the edges for remaining bake time.

While crust is baking, heat a few tablespoons of olive oil in a heavy skillet over medium heat and cook onions for approximately 20-25 minutes until they are caramelized in color. Sprinkle the onions with kosher salt a few times while cooking and stir every few minutes. As the onions begin to soften and brown, there will be residue at the bottom of the pan; stir these brown goodie bits into the onions.

Preheat oven broiler.

Spread caramelized onions over bottom of pie shell and top with 3/4 cup of the cheese. Arrange tomatoes, slightly overlapping, in circles over the cheese. Sprinkle tomatoes with kosher salt and fresh ground black pepper. Sprinkle remaining 1/4 cup of cheese over the tomatoes and drizzle a tablespoon of olive oil over the top.

Broil the pie until the cheese slightly browns, approximately 3 to 4 minutes. Garnish with fresh basil if desired.

06-09-2012

Blackberry and Blueberry Crumble Pie

I just have to say…I LOVE berry crumbles! They have to be one of the easiest desserts to make…Whip together a few ingredients, and voila! Today I used fresh from the farm berries but even in winter, crumbles taste great with frozen berries.

To try something different though, I added a pie crust which soaked up some of the juices and was still flaky and delightful.  And the ginger in this recipe adds a spicy kick for a little something more.  Hmmm…life is good!

Recipe Cost
Since most of the ingredients are on stock in my pantry, I only added the price of berries and a pie crust to come up with a total of $8 for this amazingly delish dessert. To buy a dessert this yummy at your local bakery, you’d spend close to $20. Quite the savings to make at home!

Ingredients
For the Pie Crust:
Knock yourself out making one from Grandma’s scratch recipe, or do as I do and buy refrigerated dough. One of these days, I’m going to figure out how to make a crust but for the moment, I am pretty intimidated on that front and blame it on my baking roller.  If you are just as intimidated with the daunting task of dough rolling, make sure to buy refrigerated not frozen pie crusts. Frozen pie crusts in those tin pans produce mushy crust; whereas a refrigerated one placed in your glass pie plate will produce a flaky and delectable crust.

For the Filling:
4 cups fresh blackberries and/or blueberries
1/2 cup sugar
1/4 cup flour
2 teaspoons lemon juice (~1/2 of a lemon)
1/2 Tbsp fresh minced ginger or 1 1/2 tsp grated ginger
1 Tbsp finely chopped fresh mint

For the Crumble:
1 cup flour
3/4 cup old fashioned oats
1/4 cup coarsely chopped hard nuts (almonds, walnuts, hazelnut, etc.)
1/4 cup granulated sugar
1/4 cup brown sugar
4 ounces butter, at room temperature
dash of kosher salt

For the crust ~ Preheat the oven to 350 degrees. Place pie crust in a glass pie plate and add dry beans to the top for a weight. Blind bake the pie crust for 10 minutes. Remove from the oven, remove beans or dry weights and allow to cool.

Don’t do like me and forget to add the weights/dry beans…the middle will puff up and the sides collapse into the middle!

For the filling ~ In a large, non-reactive bowl, stir together the sugar, flour, lemon juice, ginger, and mint. Next, gently mix in the berries and allow to sit for at least 10 minutes.

Pour into crust once crumble topping is made.

The berries took on a shiny sheen all by themselves. No matter the lighting, the photo looked like steam was rising.

For the crumble ~ In a mixing bowl, stir together the dry ingredients and then whisk in the butter.

You can also use a fork or your fingers. Basically, as the name implies, you just want the mixture to be crumbly looking. Place crumble mixture on top of berries in pie dish.

Bake in preheated oven for approximately 40 minutes, until golden brown.

ENJOY!!!

XoXo, Jess

Printable Recipe

Ingredients
For the Pie Crust:
9″ refrigerated pie crust

For the Filling:
4 cups fresh blackberries and/or blueberries
1/2 cup sugar
1/4 cup flour
2 teaspoons lemon juice (~1/2 of a lemon)
1/2 Tbsp fresh minced ginger or 1 1/2 tsp grated ginger
1 Tbsp finely chopped fresh mint

For the Crumble:
1 cup flour
3/4 cup old fashioned oats
1/4 cup coarsely chopped hard nuts (almonds, walnuts, hazelnut, etc.)
1/4 cup granulated sugar
1/4 cup brown sugar
4 ounces butter, at room temperature
dash of kosher salt

For the crust ~ Preheat the oven to 350 degrees. Place pie crust in a glass pie plate and add dry beans to
the top for a weight. Blind bake the pie crust for 10 minutes. Remove from the oven, remove beans or dry
weights and allow to cool.

For the filling ~ In a large, non-reactive bowl, gently mix together the sugar, flour, lemon juice, ginger,
and mint. Gently mix in the berries and allow to sit for at least 10 minutes. Pour into crust once crumble
topping is made.

For the crumble ~ In a mixing bowl, stir together the dry ingredients and then whisk in the butter. Y ou
can also use a fork or your fingers. Basically , as the name implies, you just want the mixture to be crumbly
looking. Place crumble mixture on top of berries in pie dish.

Bake in preheated oven for approximately 40 minutes, until golden brown.