01-27-2015

Buttermilk Belgian Waffles {Gluten Free & Eggless}

Regardless of winter’s blizzards or summer’s sunshine, my absolute favorite breakfast will always be Belgian waffles topped with vanilla bean ice cream and local honey.
IMG_9246
Seriously, isn’t that everyone’s favorite breakfast? How could anything else compete?

Unfortunately, going gluten free meant a hiatus from this way too often eaten delicacy. Every recipe I tried was missing something or had a very gritty aftertaste!

And then, it got worse…I realized I could no longer eat eggs!

And eggs are a  vital component to a light and crispy, deeply thick waffle. But there are plenty of vegan waffle recipes, so, I gave them a try.

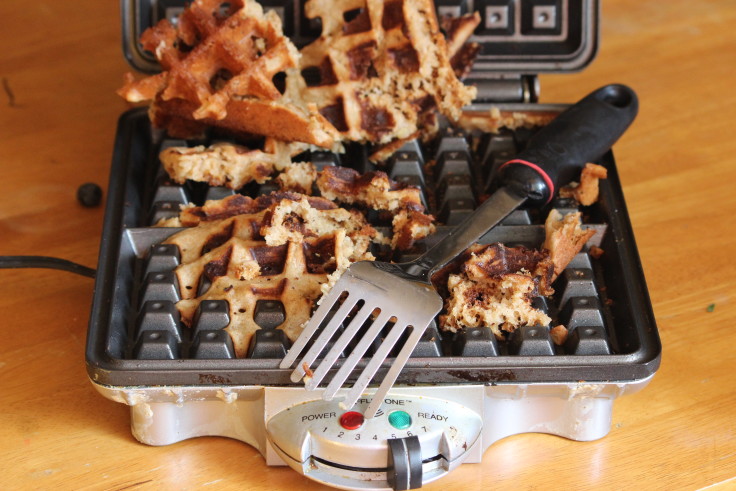
What a disaster!!! Numerous times I had to use an air compressor to remove the waffle from the waffle iron!
IMG_6534
Then a few months ago I came across America’s Test Kitchen How Can It Be Gluten Free Cookbook.

So glad I did! After months of using their  recipe as my base, I was able to perfect a waffles recipe that is eggless and doesn’t use refined sugar. Voila!

IMG_9238

{Recipe adapted from America’s Test Kitchen How Can It Be Gluten Free Cookbook}
Tips & Tricks ~

Substituting coconut sugar in lieu of granulated sugar helps produce an even browning throughout and is much healthier.
Using Ener-G Egg replacer has worked like a champ in this recipe. I did not have luck substituting flax or chia seed in waffles. You really need the extra leavening that the Ener-G Egg replacer provides. {Flax & chia substitutes work better in cookies versus bread & waffles where you are trying for a yeasty flavor.}
Most homeowner’s don’t have buttermilk readily on hand, but for this recipe, I suggest using the real deal. I tried using the cookbook’s alternate suggestion of mixing yogurt with milk and they turned out ok, just not perfect. If you try mixing milk with a tablespoon of vinegar {a normally good substitute for buttermilk} it produces a too thin batter that just doesn’t bake up correctly. 

Gluten Free Buttermilk Belgian Waffles

Yield: 4 Belgian Waffles

Ingredients

  • 6 ounces (1 1/3 cup + 1 TBSP) Gluten Free Flour Blend
  • 1 TBSP coconut sugar
  • 1/4 tsp kosher salt
  • 1/4 tsp baking soda
  • 3/4 cup + 2 TBSP buttermilk
  • 1 1/2 tsp Ener-G Egg Replacer
  • 2 TBSP almond milk unsweetened & unflavored or water
  • 2 TBSP melted butter + 1 tsp for waffle iron
  • 1 TBSP vanilla

Instructions

  1. Heat Belgian waffle iron on medium, brush iron with a tiny bit of butter as needed.
  2. In a small glass bowl, combine egg replacer with either almond milk or water. Combine well until no lumps remain and set aside.
  3. In a large mixing bowl, combine flour, sugar, salt and baking soda. Whisk to combine.
  4. Measure buttermilk in a glass measuring bowl and heat in microwave for 20 seconds, until room temperature.
  5. In a medium size bowl, combine egg replacement mixture, buttermilk, melted butter, and vanilla.
  6. Whisk liquid mixture into the dry mixture and continue to whisk for 1 minute. The batter will be thick and no lumps will remain.
  7. Once your waffle iron is preheated, spoon a 1/3 cup of batter onto each waffle iron square and cook until beeping occurs.

IMG_9251

Enjoy ~

sig

07-29-2014

Fluffy Light Spelt Biscuits

IMG_6695

I wonder what it was like when the 49’ers struck gold…did they do air kicks while shrieking out “Eureka”? Because that’s what I did when I took my first bite of these delicious biscuits. They are that scrumptious!

Baking with spelt can be tricky. Sometimes it leads to hocky puck dense biscuits or the opposite end of the spectrum…cookies that  spread all over the baking sheet. But these turned out pretty close to perfect and I think a lot of that has to do with keeping the butter properly chilled and using the correct techniques to ensure as much steam as possible gets trapped inside the baking biscuits.

I’m pretty sure that my grandma’s would agree with me that making biscuits is an art form and these tips & tricks below will help you get it just right so you can do your own air kicks!

Enjoy ~

sig

Tips & Tricks

The chilled, almost frozen, butter leads to more steam being produced in the baking process which leads to more tender & fluffy biscuits. And folding the biscuits like a letter is what produces lots of different layers in your biscuits. Also, if you twist the cutter instead of going straight down your biscuits will not rise very well. And placing the biscuits so close together traps more steam as well.

Fluffy Light Spelt Biscuits

Prep Time: 35 minutes

Cook Time: 12 minutes

Total Time: 47 minutes

Yield: 6-8 biscuits

Ingredients

  • 2 cups white spelt flour (VitaSpelt recommended)
  • 1 TBSP baking powder
  • 1/2 tsp kosher salt
  • 5 TBSP chilled butter
  • 1/2 - 2/3 cup milk

Instructions

  1. Preheat oven to 450 degrees F. Line a baking sheet with parchment paper or silpat liner.
  2. Take chilled butter out of fridge and with a paring knife, cube into 1/2" pieces. Place cubed butter into freezer for at least 5 to 10 minutes.
  3. In a large bowl whisk together the flour, baking powder, and salt. Using a fork or pastry blender cut the butter cubes into the flour until it resembles coarse crumbs. Place bowl into the freezer and allow the flour & butter mixture to chill thoroughly for 15 minutes.
  4. Using a wooden spoon, mix the milk into the chilled flour, starting with just 1/2 cup of the milk. Stir gradually until the flour begins to pull together and dough is completely sticky, adding additional tablespoons of milk as needed. I used a full 2/3 cup of milk but it is always best to start with less milk and add more as you go.
  5. Sprinkle a generous amount of flour onto a pastry mat or wooden surface. Place dough onto floured surface and then sprinkle another generous amount all over the top of the dough. Using the palm of your hand, pat out the dough until it is approximately a 1" thick rectangle/letter shape.
  6. As you work with the dough, don't be afraid to sprinkle extra flour on top and sides as needed. You don't want to dry out the dough but at the same time, you don't want it so sticky that it sticks to your hand.
  7. Now fold the rectangular dough up the same way you would a letter. So the bottom third up onto the middle, then fold the top dough onto the middle portion. Pat down again to a 1" thick rectangle/letter shape. Repeat the fold process one more time. Pat the dough down to a final 1" thickness.
  8. Using a 3" round biscuit cutter, press biscuit cutter straight down without twisting it. Place biscuits directly onto the lined baking sheet, spacing only 1/2" apart.
  9. Bake for approximately 12 minutes, rotating halfway through, until golden brown.


06-04-2013

A New Parenting High

I know, I know…I haven’t posted in 6+ months and here I am this am with 2 posts!!!

I guess since many people consider me a ‘foodie’, I often hear comments like…”your kids must eat so well” or “wow, how do you get your kids to eat their veggies?” Well lets be honest…

This am my 3 year old started the morning with icecream (couldn’t take those strawberry crumb pics and not share some of the goodness) and then we moved on to the next best nutritious food possible for breakfast …. pizza! Why not? And, I didn’t just give them leftover pizza. I actually baked them a pizza for breakfast.

How’s that for an accomplished mom? At least they really enjoyed it!!

IMG_1979 IMG_1980 IMG_1977 IMG_1985


Happy Tuesday!

Jess

09-11-2012

Cranberry & Almond Granola Bars

I thought you might be tiring of the same ‘ol descriptive words…amazing or yummy or delicious! So I thought I’d go all crazy and call these granola bars…Most Delicious!

These are SOoooo good that the hardest part is to stop eating the granola mix before you bake it. You know, so you could actually end up eating the finished product!

This recipe is inspired from Smitten Kitchen Thick & Chewy Granola Bars. I really liked how flexible her recipe was but I wanted to try making these without any corn syrup. I also lowered the sugar and omitted the salt so we could be justified when we eat half the granola bars in one sitting! And I require the peanut butter as it really helps the granola bar stay uncrumbly and contributes to the chewiness factor. Plus, I threw in coconut to counteract the lowered sugar.

And oh yeah, these are gluten free!

The list of characters….

Makes 16 granola squares

Ingredients

2 cups quick cooking oats, gluten free if necessary
1/2 – 2/3 cup organic sugar
2 cups nuts (I think slivered almonds are best and very kid friendly…but feel free to shake it up!)
1/2 cup dried fruit (myself, I’m a big cranberry fan)
1/2 cup shredded coconut
1/3 cup ground flax seed (optional)
1/4 cup peanut butter
5 tbsp unsalted butter, melted
1 tbsp H2O (I do not remember much from chemistry but I love using this abbreviation for water)
a little less than 1 oz of each: honey, maple syrup, and molasses (1/3 cup in total when all three are combined…just fill 1/3 measuring cup up with some of each)
Instructions

Preheat oven to 350 degrees. Butter a piece of parchment paper large enough to extend over a 9″x9″ baking pan. You want to be able to use the sides of the parchment paper to lift the baked granola out of the pan prior to cutting.

Place 1/3 cup of the oats into a food processor and chop until the oats reach flour like consistency. You are basically making oat flour. If desired, you could just use store bought oat flour but I like the do-it-yourself method.

In a large mixing bowl, combine the oat flour with remaining 1 and 2/3 cups oats and all other dry ingredients. In a separate bowl, stir together the melted butter, peanut butter, water, and the 1/3 cup mixture of honey, maple syrup, and molasses. (I hope the 1/3 cup makes sense…basically just put a tad of each into a 1/3 measuring cup).

Now comes the fun part! Pour the moist ingredients into the dry ingredients and mix together until well combined. You can use a plastic spatula, wooden spoon, or your hand for this part. I use my hand…easier to eat the stuff as I go along!

Now, STOP eating the granola and leave some for the granola bars!!!

Spread into the buttered parchment paper/baking pan.  And then press down the granola with your hands or a large spatula as much as possible. This is really important to help the granola bars stick together. Bake for 20 minutes, until slightly darkened on top. Remove from oven and once again, with a spatula, press the mixture down to help with the adhesiveness.

Do not remove the parchment paper from the pan for at least 30 minutes. This also helps the bars to  seal together. And if it’s really humid out, after letting the bars reach room temperature, place them into the fridge and allow to cool further for an hour or so more.

I’m telling you this so Kashi & Nature Valley will be jealous of how well your home made granola bars stay together!

Now, once you are ready to eat these bad boys, use a serrated knife to cut these in a sawing motion. Oh wait, you’ve already stolen a little bite…don’t worry…I have too when they come right out of the oven, but it’ll just be our secret!

Store bars in the refrigerator or freezer in a resealable bag. If frozen, simply allow the granola bar to sit out at room temperature for about 5 minutes. They’ll be cool, calm, and so satisfying!

Also, you can substitute chocolate chips for the dried fruit or drizzle chocolate on top if desired. I’ve found that cranberries and slivered almonds are my favorite way to go. When I’ve tried adding chocolate, the bars were still good but almost a little too rich or intense. So you may want to reduce the peanut butter a little if you add chocolate. Also, if you aren’t into dried fruit or chocolate then feel free to use all nuts. The basic amount is 2 to 3 cups total of nuts and dried fruit.

I’m really not kidding about how addictive these are. It is so hard to eat just one, so hard to put that spoon down once all the ingredients are combined…you just CAN’T STOP! Or, at least I can’t!

I hope ya’ll like these as much as my family does!

Love,

Jessica

01-11-2012

What muffins should I make tomorrow?

I’m taking a break today from baking and wanted to know what kind of muffin you’d like me to bake next? Something savory or something heart healthy? I’d love to have an actual muffin name so just write in your favorite muffin.

I have tried & true berry muffin recipes but thought ya’ll might want something different than the norm.

Happy Baking,

Jess

01-10-2012

Banana Bread Muffins

I have never been so thrilled or excited to see and taste these muffins. I am not a big lover of banana bread because normally, in my opinion – and its all about me, they are way overpowered with bananas. But these have a hint of banana and also have coconut, applesauce, and molasses for depth of flavor. The coconut makes it sweet and provides an interesting texture, but again, not so much to make it all about one flavor. These simply are scrumptious!

Yum!

Banana Bread Muffins
Yields 24 muffins 

2 cups all purpose flour
1 tsp baking soda
1/2 tsp kosher salt
1/2 cup quick-1 minute oatmeal
1/2 cup pecans or walnuts
2 to 2.5 medium bananas
1 brown egg, lightly beaten, preferably from a local farm
1 tsp pure vanilla extract
3/4 cup granulated cane sugar, preferably organic
1/2 cup butter
1/2 cup applesauce
1/3 cup shredded coconut
1/8 cup molasses

Preparation

Preheat oven to 350 degrees and line muffin pan with paper liners.

Mash bananas in small bowl, stirring in vanilla, then set aside. In a food processor chop pecans and set aside.  Next, chop oats in processor and then combine, in a large bowl, with flour, baking soda, and salt.

Melt butter in a separate bowl and then stir in sugar until it has completely dissolved.

Next, mix in the applesauce, molasses, beaten egg, and coconut; stirring well.

Thought this picture was neat

Make a well in the bottom of the dry mixture and stir in butter mixture until almost combined but not completely.

Here is what the 'well' should look like before mixing in liquid ingredients

Then mix in the banana mixture and pecans, being careful to not over stir. Fill muffin cups with 1 1/2 to 2 tbsps of batter.

How full my muffin liners were

Bake at 350 degrees for 15-18 minutes, turning pan halfway through.

Enjoy!

Jessica

01-09-2012

Lemon Poppyseed Muffins

Welcome to Muffin Week!!! I have lots of tasty muffins in store for you this week and today’s muffins include one of my favorite ingredients – poppy seed. You’ll find that I went a tad (okay, maybe more than a tad) overboard on the poppy seed, so feel free to use less. I just love their crunch!

I cannot explain how many times I’ve tried creating a lemon poppyseed muffin but I could never figure out the right proportion of ingredients. It is normally too greasy or too spongy and no matter how much I altered butter/oil/milk/egg I could never get them right. Well this one worked perfect! I found a recipe for a poundcake muffin and decided to use half the yogurt, added in milk, and a lot more poppy seed.

So without further adieu….

Lemon Poppyseed Muffins
Adapted from Joy of Baking
Yields 12 – 15 muffins

Ingredients

2 cups all purpose flour
3+ tbsp poppyseeds
1/4 tsp kosher salt
1/2 tsp baking soda
4 ounces plain yogurt
4 ounces whole milk
4 ounces unsalted butter, softened
1 cup organic cane sugar
1 large brown egg, preferably from a farm, lightly beaten
grated lemon zest from 1 large lemon
1 tbsp pure vanilla extract

Preparation

Preheat oven to 400 degrees and line a muffin pan with paper liners.

In a large mixing bowl, stir together the flour, poppy seeds, salt, and baking soda. In another bowl, mix together the yogurt, milk, lemon zest, and vanilla extract.

Using an electric mixer, beat the softened butter and sugar until it is light and fluffy, approximately 5 minutes. Mix in the egg, beating well to ensure it is mixed thoroughly. Now, beat in the liquid milk mixture, scraping down the sides as needed.

Next, make a well in the bottom of your dry mixture bowl. (I forgot to take a picture of this step, but basically you just want there to be an empty spot in the bottom middle of your dry mixture.) Pour the liquid into this well and stir until just combined. BE CAREFUL – the more you stir, the less your muffins will rise and be airy. So do not overmix/overstir, etc.

Fill muffin tins approximately 1/2 to 2/3  full and bake for 15-18 minutes in preheated oven. I hope you enjoy as much as I did!

There are lots of tried & true ways to make your muffins turn out just right – where they look great and taste even better. Click here to view Joy of Baking’s helpful hints for making muffins.

And I’d love to know…What is your favorite type of muffin?

Jess