Archives for January 2012

01-19-2012

A week well lived…

This past week I’ve been incognito on the blog so that I could spend some quality time with my kids. Sometimes its hard to balance it all and when I look back, I know it’ll be time with my kids that I’ll miss most. (Although, there are numerous moments every day when I wonder why I got myself into this mess called motherhood!)

So I thought I’d share what I’ve done in my time off…

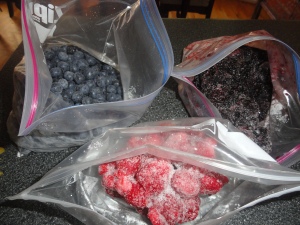
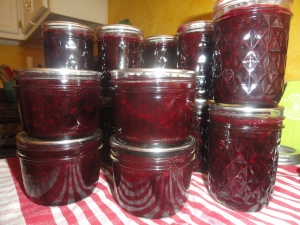
In the summer the kids & I pick berries and sometimes we use them immediately. But often, I am so exhausted after berry picking that I freeze them for later usage. Well, that later available time on my hands finally appeared and I made berry jam and a berry crisp on Saturday.

June berries frozen for winter usage

Berry Jam made with local honey for a sweetener

Berry Crisp ~ Scrumptious!

And then last week I ordered an extra bag of carrots from the local farm grocer but had no idea how many was actually in a bag! So imagine my surprise when I saw all these carrots in my produce bags. Hence, we had to get a little creative…    Ta Da…salsa verde chicken enchiladas with roasted carrots. (On a side note…does everyone love roasted veggies as much as me? Tender and sweet on the inside and crunchy and salty on the outside.)

Carrots from a local farm

...like my new plates???

And to keep it all in perspective about what matters…here is what greeted me on the couch this evening! I am guessing this was some type of battlefield/dinosaur construction site. (A little almost 4 year old who should be sleeping but is now by my side has just informed me that it is pluff mud and they were ‘just stuck, mom’.)

A child's masterpiece

Do you enjoy eating playdoh? Random question to end with but can I just say – my daughter loves it and it is disgusting tasting. I made it myself hoping that the homemade version which is pretty much 100% salt would ward her off. Nope…

So here’s to playdoh masterpieces and spending time with your kids,

Jess

01-11-2012

What muffins should I make tomorrow?

I’m taking a break today from baking and wanted to know what kind of muffin you’d like me to bake next? Something savory or something heart healthy? I’d love to have an actual muffin name so just write in your favorite muffin.

I have tried & true berry muffin recipes but thought ya’ll might want something different than the norm.

Happy Baking,

Jess

01-10-2012

Banana Bread Muffins

I have never been so thrilled or excited to see and taste these muffins. I am not a big lover of banana bread because normally, in my opinion – and its all about me, they are way overpowered with bananas. But these have a hint of banana and also have coconut, applesauce, and molasses for depth of flavor. The coconut makes it sweet and provides an interesting texture, but again, not so much to make it all about one flavor. These simply are scrumptious!

Yum!

Banana Bread Muffins
Yields 24 muffins 

2 cups all purpose flour
1 tsp baking soda
1/2 tsp kosher salt
1/2 cup quick-1 minute oatmeal
1/2 cup pecans or walnuts
2 to 2.5 medium bananas
1 brown egg, lightly beaten, preferably from a local farm
1 tsp pure vanilla extract
3/4 cup granulated cane sugar, preferably organic
1/2 cup butter
1/2 cup applesauce
1/3 cup shredded coconut
1/8 cup molasses

Preparation

Preheat oven to 350 degrees and line muffin pan with paper liners.

Mash bananas in small bowl, stirring in vanilla, then set aside. In a food processor chop pecans and set aside.  Next, chop oats in processor and then combine, in a large bowl, with flour, baking soda, and salt.

Melt butter in a separate bowl and then stir in sugar until it has completely dissolved.

Next, mix in the applesauce, molasses, beaten egg, and coconut; stirring well.

Thought this picture was neat

Make a well in the bottom of the dry mixture and stir in butter mixture until almost combined but not completely.

Here is what the 'well' should look like before mixing in liquid ingredients

Then mix in the banana mixture and pecans, being careful to not over stir. Fill muffin cups with 1 1/2 to 2 tbsps of batter.

How full my muffin liners were

Bake at 350 degrees for 15-18 minutes, turning pan halfway through.

Enjoy!

Jessica

01-09-2012

Lemon Poppyseed Muffins

Welcome to Muffin Week!!! I have lots of tasty muffins in store for you this week and today’s muffins include one of my favorite ingredients – poppy seed. You’ll find that I went a tad (okay, maybe more than a tad) overboard on the poppy seed, so feel free to use less. I just love their crunch!

I cannot explain how many times I’ve tried creating a lemon poppyseed muffin but I could never figure out the right proportion of ingredients. It is normally too greasy or too spongy and no matter how much I altered butter/oil/milk/egg I could never get them right. Well this one worked perfect! I found a recipe for a poundcake muffin and decided to use half the yogurt, added in milk, and a lot more poppy seed.

So without further adieu….

Lemon Poppyseed Muffins
Adapted from Joy of Baking
Yields 12 – 15 muffins

Ingredients

2 cups all purpose flour
3+ tbsp poppyseeds
1/4 tsp kosher salt
1/2 tsp baking soda
4 ounces plain yogurt
4 ounces whole milk
4 ounces unsalted butter, softened
1 cup organic cane sugar
1 large brown egg, preferably from a farm, lightly beaten
grated lemon zest from 1 large lemon
1 tbsp pure vanilla extract

Preparation

Preheat oven to 400 degrees and line a muffin pan with paper liners.

In a large mixing bowl, stir together the flour, poppy seeds, salt, and baking soda. In another bowl, mix together the yogurt, milk, lemon zest, and vanilla extract.

Using an electric mixer, beat the softened butter and sugar until it is light and fluffy, approximately 5 minutes. Mix in the egg, beating well to ensure it is mixed thoroughly. Now, beat in the liquid milk mixture, scraping down the sides as needed.

Next, make a well in the bottom of your dry mixture bowl. (I forgot to take a picture of this step, but basically you just want there to be an empty spot in the bottom middle of your dry mixture.) Pour the liquid into this well and stir until just combined. BE CAREFUL – the more you stir, the less your muffins will rise and be airy. So do not overmix/overstir, etc.

Fill muffin tins approximately 1/2 to 2/3  full and bake for 15-18 minutes in preheated oven. I hope you enjoy as much as I did!

There are lots of tried & true ways to make your muffins turn out just right – where they look great and taste even better. Click here to view Joy of Baking’s helpful hints for making muffins.

And I’d love to know…What is your favorite type of muffin?

Jess

01-06-2012

A week of muffins

Here in my house we adore muffins! I love to bake them and my kids love to eat them! So with all that muffin love, I thought I’d declare next week MUFFIN WEEK and share some of my favorite muffin recipes with you. From the classic blueberry to banana bread to lemon poppy seed….these are the visions of my heart. I’ve tried to make them as healthy as possible while still making them taste like a muffin should. They all have fruit in them and are all delicious!

So check in next week for some new takes on tasty muffins!

Have a great weekend ~ Jess

Blueberry muffins made from local blueberries

Lemon Poppy Seed Muffins

01-05-2012

Gardening in 2012

In case you don’t know me personally, one of my first loves is gardening. The majority of my childhood memories revolve around planting, weeding, harvesting, and then more weeding! In fact, I think the only time in my life I did not have a garden was when I was in college.

I am very fortunate that my husband loves to garden as much as me and until now, we’ve been pretty lucky that our back yard provided the basic needs for a garden… dirt, rain, and sun. But then, I woke up one day in summer 2011 and said, “What’s that?” Then came the reply… “Oh, its our Live Oak Tree that somehow massively spread its wings and now shades the majority of our two 8’x8′ raised beds!”

After some grumbling (okay, quite a bit of grumbling), you finally realize that will get you nowhere and you better start making lemonade from those lemons!

So this year we are going to begin a new garden plot in front of our back porch and lucky you, are going to get to hear all about it!

Here are pictures of our old garden spots and where our new garden spot will be. We are going to do away with the garden to the left but still try to get something to grow in the other garden, despite the shade. And I’m sure there will still be enough dirt remaining in the ‘old’ garden for my kids to enjoy playing in their own garden spot.

Sad, Sad Garden...Go Away Mr. Shade

Our new garden spot...think it has potential?

This was taken a few years back and last year's garden was nowhere near as green.

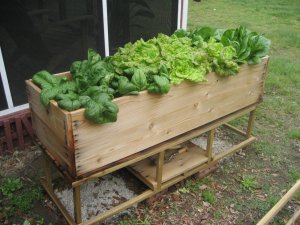
Awesome lettuce box my husband built me which still gets enough sunlight - yeah!

I hope you’ll humor me and read along as I blog about our garden adventures this year and I hope you’ll try some gardening yourself. From small pots, to old wheelbarrows, to an abandoned neighborhood lot…plant some seeds, give them water, and let the sun do the rest!

I’d love to hear about your gardening adventures!

Jess

01-04-2012

Classic Pot Roast

This meal is nothing fancy, nothing elaborate, but is so good in the simple essence of roasted beef. It is comforting on a cold night and can be served to good friends over for dinner to just catch up & relax. I hope you enjoy!

Budget Note: This grass fed 1.5 pound boneless chuck roast cost me under $12 and fed 4 adults. The portions were a healthy amount combined with a side of brown rice and roasted carrots & onions. The total cost for my entire dinner was $4/person. So maybe next week you can find some locally raised, grass fed beef to include in your weekly menu. And, if you only fed 2 adults this roast, you could put the leftovers into a stir fry to stretch the meat further.

Classic Pot Roast

Ingredients
Marinade
3 tablespoons ketchup
2 tablespoons cider vinegar
2 tsp olive or canola oil
2 tsp soy sauce
2 tsp Worcesteshire or Heinz 57 Sauce
1/4 tsp dijon mustard
1/4 tsp garlic powder
1/4 tsp fresh ground pepper
1.5 lb boneless chuck roast

Roast
1 small yellow onion, cut into quarters
2 cups fresh baby carrots, sliced in half
2 garlic cloves, chopped
2 bay leaves
1/4 cup chicken broth
1/4 cup red wine

Preparation
In a gallon size Ziploc bag mix together all of the marinade ingredients and then add the roast. Allow to marinate for 4-8 hours, or overnight.

Preheat oven to 350 degrees. In a dutch oven or oven safe skillet, heat apprx. 2 tsp of olive oil over medium high heat. Remove roast from marinade and discard marinade. Apply kosher salt and fresh ground pepper to roast and then sear on each side for approximately 4-5 minutes. This helps seal in the juices. Once all sides have been seared, remove roast from pan.

Reduce heat to low and add onions, carrots, and garlic. Saute for approximately 1 minute and then add in chicken broth, stirring up the browned bits on bottom of pan. Remove from heat and place 1 bay leaf on the top of carrots & onions.

On top of this, place the roast. Then add the remaining bay leaf on top of the roast.

Lastly, pour the red wine over the bay leaf and roast.

Place pan into preheated oven and allow to cook for approximately 45 minutes to 1 hour. The time in oven will all depend upon the size of your roast. If your roast is 3 to 4 pounds it will probably require 1.5 to 2 hours roasting time. Use a digital thermometer (LOVE MY HUSBAND….he got me a new (and working one) for Christmas!) to determine when your roast is finished. Medium rare will be 145 degrees; medium will be 160 degrees; and well-done will be 170 degrees.

Remove your roast from pan and allow to rest for 10 minutes. Resting allows all the juices to settle back down. Enjoy with the carrots & onions. This would also be great served with mashed potatoes. Maybe, blue cheese mashed potatoes? Yummm! Also, the juices in the bottom of the pan make this even juicier!

I’d love to hear if you try the recipe out or if you have another classic pot roast recipe you use.

Cheers to eating locally & humanely raised cattle!

Jess

01-02-2012

Very versatile mango salsa

Happy New Year’s!!! I hope everyone had a wonderful Christmas & New Year’s and has made it through day 2 of their New Year’s resolutions.

I’m guessing I am not the only one hoping to eat more healthy this year, so I want to share a tasty fruit salsa we had during our trip to Nebraska over Thanksgiving. This salsa is spicy, sweet, and addictive. Which is perfect when watching yet another, BCS BOWL GAME! Unfortunately, the Huskers lost today but it was a lot of fun to try to cheer them on.

The good news about this recipe is that it is very versatile so feel free to substitute with what is in your crisper. This recipe is actually a variation of the original because my cousins got creative with what was in their kitchen.

NOTE: If you have a garden still going you might have some cilantro fresh on hand and hopefully a local farmer will have onions available. For future reference later this year…You can freeze peppers for 2 to 3 months and they’ll still provide a kick. So this October/November when you experience WAY TOO MANY peppers on hand, put some in a freezer bag for later use. A good way to have herbs always on hand is to harvest continually during the growing season and preserve by placing chopped herbs in ice cube trays and adding water on top. Once frozen, place cubes into Ziploc bags.

Mango Fruit Salsa

Ingredients

1 medium sized mango
1 small can crushed pineapple
1 medium sized apple
1/2 cup diced red onion
2 jalapenos
2 tbsp chopped cilantro
2-3 tbsp fresh lime juice
1-2 tbsp olive oil
dash of kosher salt

Recipe

After peeling the mango, apple, and onion, roughly chop and dice them along with the jalapenos and cilantro. Place all items except for salt in a food processor and chop until desired consistency is reached. This can be as chopped/pureed as you would like. Season with just a dash of kosher salt if desired.

Now, what made this fruit salsa especially great were the cinnamon sugar chips we had with it! I unfortunately do not have a picture but here is a recipe. And beware, you’ll eat a ton of these just as soon as they come out of the oven so definitely buy more tortilla shells than you think you’ll use!

Cinnamon Sugar Tortilla Chips

Ingredients
24 ounce bag flour tortillas
4 tbsp unsalted butter
1 cup sugar
1 – 2 tbsp ground cinnamon

Note: The ratio of sugar to cinnamon is a suggestion. Add/Decrease each amount to what suits your taste.

Recipe
Preheat oven to 350 degrees. Melt butter in a microwavable bowl and in a separate bowl stir together the cinnamon and sugar.

Brush melted butter over one side of a tortilla and then generously sprinkle with cinnamon sugar. Cut into 8 pieces and place on an unlined cookie sheet. Continue the above process with additional tortilla shells until cookie sheet is filled.  Bake at 350 degrees for 10 – 15 minutes or until crispy and lightly golden.

Happy Football Watching & Happy New Year’s!

Jessica

PS…And can I just say how lucky & blessed I am to be able to call my husband’s cousins my own and so thankful for how welcoming they’ve been to me through the years. Love ya’ll!